


实验拓扑图结构:实验目的:AREA0是骨干区域,AREA1,AREA2是标准区域在ospf中非骨干区域需要跟骨干区域相连,不然不能通讯,但是骨干区域接口有限,没有跟骨干区域相连的只有通过设置虚链路才可
.
实验拓扑图结构:
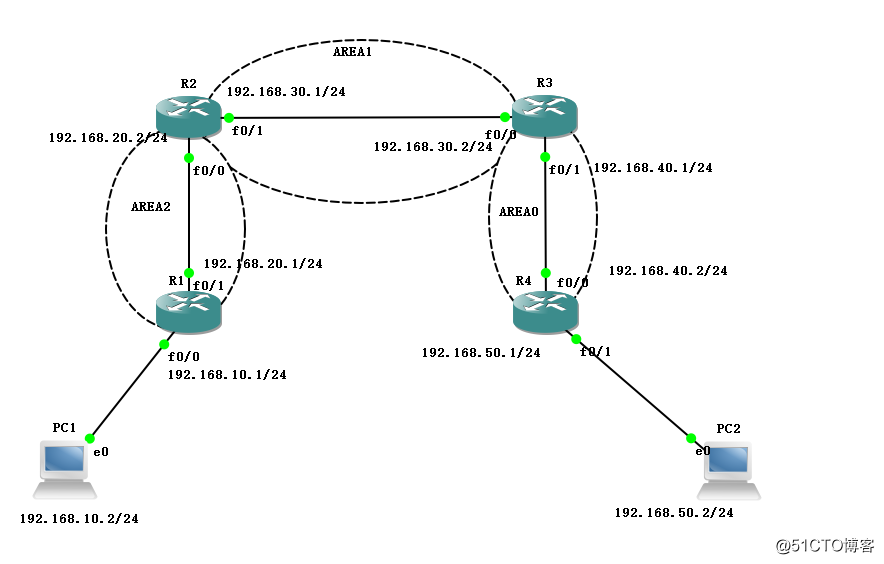
实验目的:
AREA0是骨干区域,AREA1,AREA2是标准区域
在ospf中非骨干区域需要跟骨干区域相连,不然不能通讯,但是骨干区域接口有限,没有跟骨干区域相连的只有通过设置虚链路才可建立通讯。
环境设置:
R1:
f0/0(192.168.10.1/24)
f0/1(192.168.20.1/24)
R2:
f0/0(192.168.20.2/24)
f0/1(192.168.30.1/24)
R3:
f0/0(192.168.30.2/24)
f0/1(192.168.40.1/24)
R4:
f0/0(192.168.40.2/24)
f0/1(192.168.50.1/24)
PC1:192.168.10.2/24
PC2:192.168.50.2/24
(一)配置R1路由器
R1#conf t 全局模式Enter configuration commands, one per line. End with CNTL/Z.R1(config)#int f0/0 配置接口f0/0R1(config-if)#ip add 192.168.10.1 255.255.255.0R1(config-if)#no shutR1(config-if)#int f0/1 配置接口f0/1R1(config-if)#ip add 192.168.20.1 255.255.255.0R1(config-if)#no shutR1(config-if)#exR1(config)#int loopback 0 设置本地的回环网卡固定IPR1(config-if)#ip add 1.1.1.1 255.255.255.255R1(config-if)#no shutR1(config-if)#exR1(config)#router ospf 1 设置ospf并宣告网段R1(config-router)#router-id 1.1.1.1R1(config-router)#network 192.168.10.0 0.0.0.255 area 2R1(config-router)#network 192.168.20.0 0.0.0.255 area 2

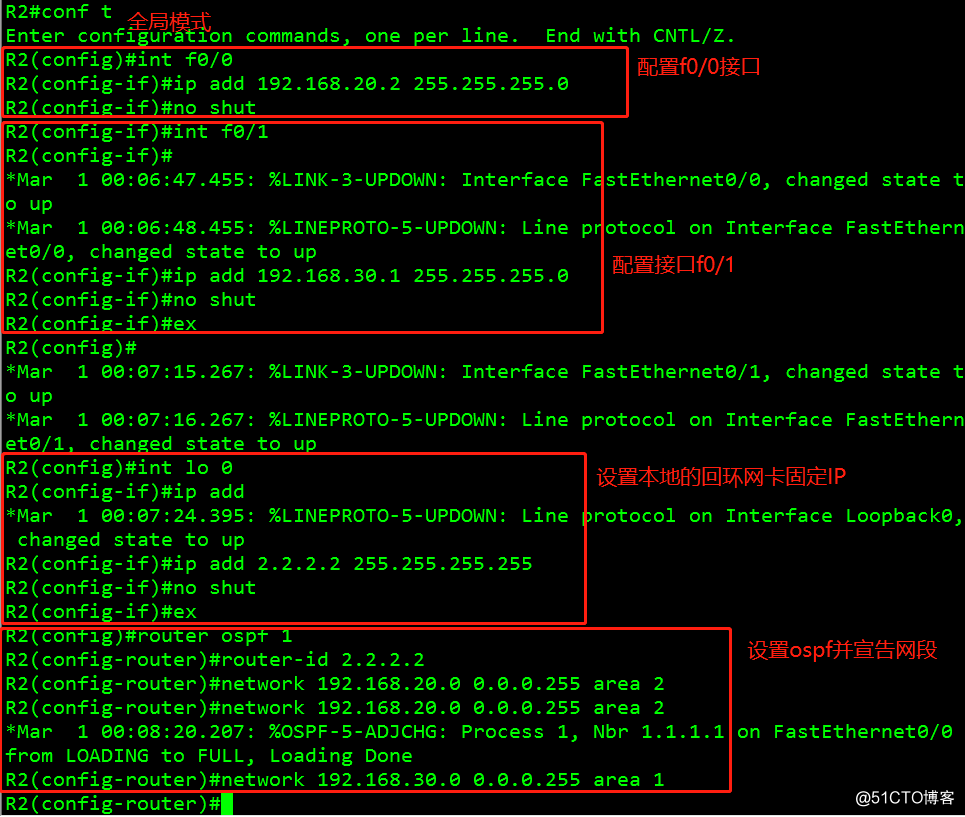
(二)配置R2路由器
R2#conf t 全局模式Enter configuration commands, one per line. End with CNTL/Z.R2(config)#int f0/0 配置f0/0接口R2(config-if)#ip add 192.168.20.2 255.255.255.0R2(config-if)#no shutR2(config-if)#int f0/1 配置f0/1接口R2(config-if)#ip add 192.168.30.1 255.255.255.0R2(config-if)#no shutR2(config-if)#exR2(config)#int lo 0 设置本地的回环网卡固定IPR2(config-if)#ip add 2.2.2.2 255.255.255.255R2(config-if)#no shutR2(config-if)#exR2(config)#router ospf 1 设置ospf并宣告网段R2(config-router)#router-id 2.2.2.2R2(config-router)#network 192.168.20.0 0.0.0.255 area 2R2(config-router)#network 192.168.30.0 0.0.0.255 area 1
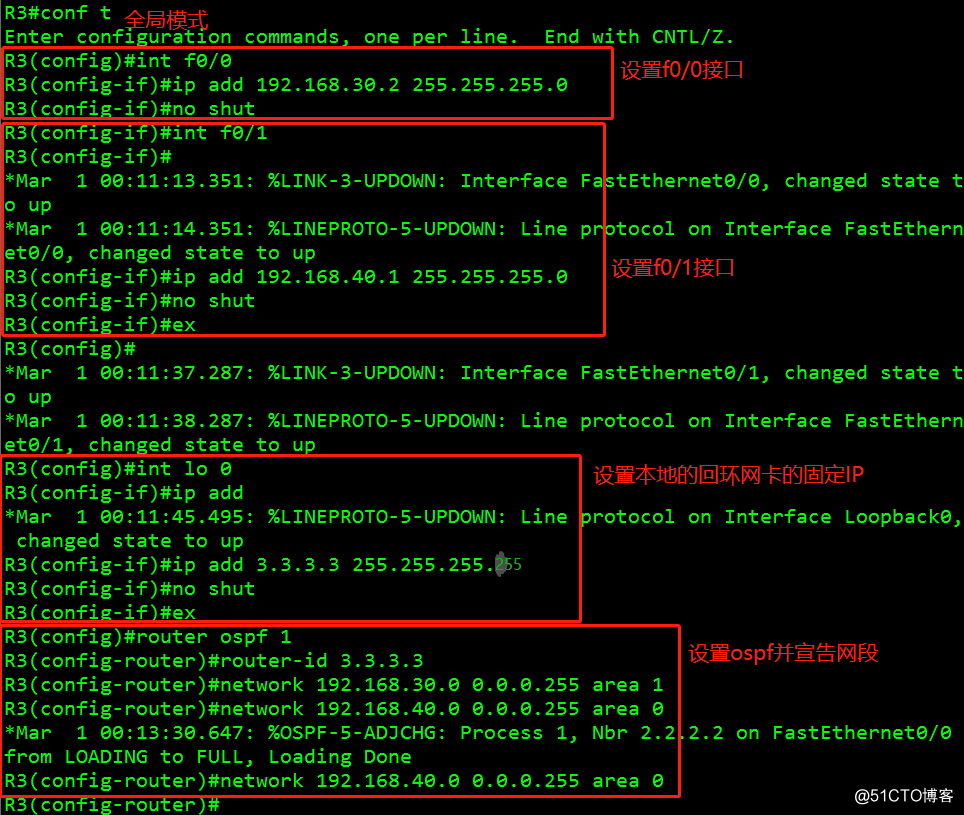
(三)配置R3路由器
R3#conf t 全局模式Enter configuration commands, one per line. End with CNTL/Z.R3(config)#int f0/0 配置接口f0/0R3(config-if)#ip add 192.168.30.2 255.255.255.0R3(config-if)#no shutR3(config-if)#int f0/1 配置接口f0/1R3(config-if)#ip add 192.168.40.1 255.255.255.0R3(config-if)#no shutR3(config-if)#exR3(config)#int lo 0 配置本地的回环网卡固定IPR3(config-if)#ip add 3.3.3.3 255.255.255.255R3(config-if)#no shutR3(config-if)#exR3(config)#router ospf 1 设置ospf并宣告网段R3(config-router)#router-id 3.3.3.3R3(config-router)#network 192.168.30.0 0.0.0.255 area 1R3(config-router)#network 192.168.40.0 0.0.0.255 area 0
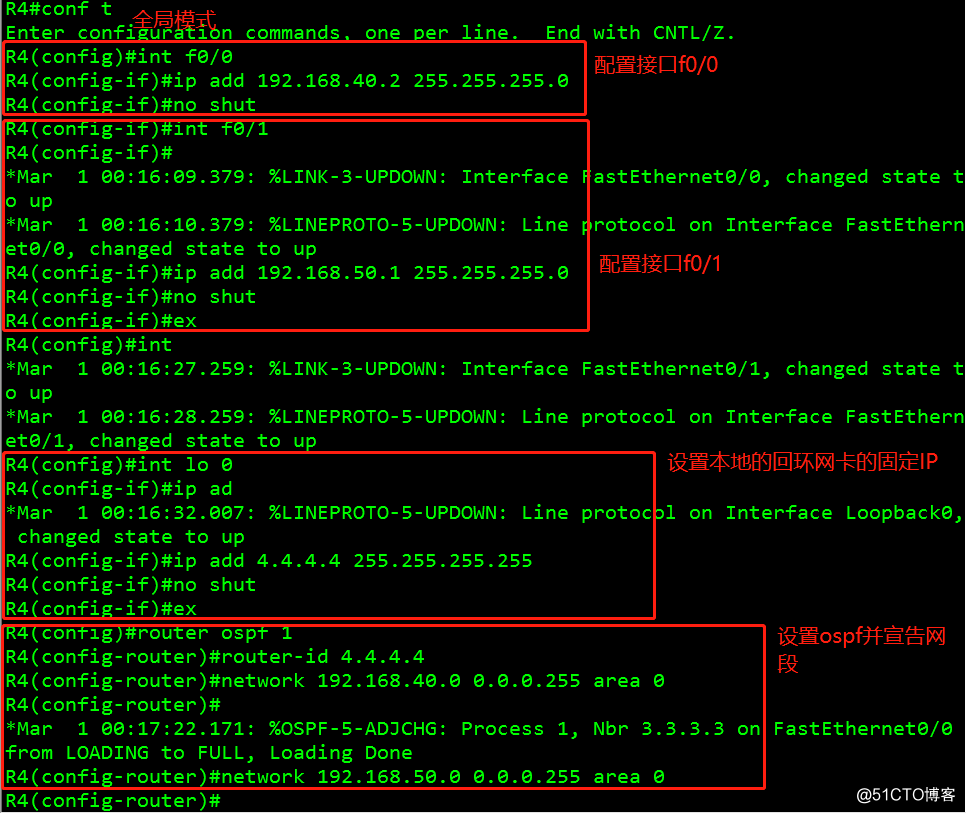
(四)配置R4路由器
R4#conf t 全局模式Enter configuration commands, one per line. End with CNTL/Z.R4(config)#int f0/0 配置f0/0接口R4(config-if)#ip add 192.168.40.2 255.255.255.0R4(config-if)#no shutR4(config-if)#int f0/1 配置f0/1接口R4(config-if)#ip add 192.168.50.1 255.255.255.0R4(config-if)#no shutR4(config-if)#exR4(config)#int lo 0 设置本地回环网卡固定IPR4(config-if)#ip add 4.4.4.4 255.255.255.255R4(config-if)#no shutR4(config-if)#exR4(config)#router ospf 1 设置ospf并宣告网段R4(config-router)#router-id 4.4.4.4R4(config-router)#network 192.168.40.0 0.0.0.255 area 0R4(config-router)#network 192.168.50.0 0.0.0.255 area 0
(五)配置PC1,PC2的地址和网关
pc1:
PC1> ip 192.168.10.2 192.168.10.1

pc2:
PC2> ip 192.168.50.2 192.168.50.1

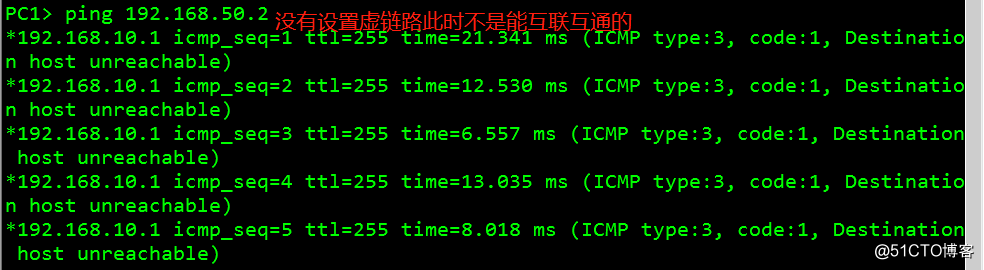
(六)测试没有设置虚链路,pc1能否ping通pc2
(七)在R2和R3中设置虚链路
R2:
R2(config)#router ospf 1 进入ospf进程1R2(config-router)#area 1 virtual-link 3.3.3.3 设置虚链路连接到R3

R3:
R3(config)#router ospf 1 进入ospf进程1R3(config-router)#area 1 virtual-link 2.2.2.2 设置虚链路连接到R2

(八)此时我们看两台pc机能否互联互通

在OSPF中非骨干区域没有直接连接骨干区域的,我们可以通过设置虚链路的方式来实现互联互通。
谢谢阅读!!!
.