


开头的时候说过,能接触到maven,全赖boss的高明只见在项目中使用了。也亏得开明的boss甩给了我一周多的时间去了解和研究。程序员的行业,废话再多也抵不过真枪实弹,以下介绍一下我在项目中是如何使用
开头的时候说过,能接触到maven,全赖boss的高明只见在项目中使用了。也亏得开明的boss甩给了我一周多的时间去了解和研究。程序员的行业,废话再多也抵不过真枪实弹,以下介绍一下我在项目中是如何使用maven的。
这个maven项目是一个有三个子系统,分别是admin、index和search。

图1 [项目总结构图]
我们首先分析一下图1:
build->存放构建生成的打包项目
core->存放核心代码项目
doc->存放项目文档的文件夹
modules->存放功能模块项目
*.bat ->构建项目包的脚本
其实,对maven来说,core或者modules中的项目均为module,只不过在我这个项目中就按照功能划分了一下而已。
先来看一下目录结构中的pom.xml,这个文件主要用来管理各个module
<?xml version="1.0" encoding="UTF-8"?><project xmlns="http://maven.apache.org/POM/4.0.0" xmlns:xsi="http://www.w3.org/2001/XMLSchema-instance" xsi:schemaLocation="http://maven.apache.org/POM/4.0.0 http://maven.apache.org/xsd/maven-4.0.0.xsd"> <modelVersion>4.0.0</modelVersion> <groupId>test.maven</groupId> <artifactId>test</artifactId> <version>2.1.60-SNAPSHOT</version> <packaging>pom</packaging> <profiles> <!-- 全部模块 --> <profile> <id>all</id> <modules> <module>core/parent/pom.xml</module> <module>core/core/pom.xml</module> <module>core/wordsegment/pom.xml</module> <module>core/queryprocessor/pom.xml</module> <module>modules/index/pom.xml</module> <module>modules/search/pom.xml</module> <module>modules/admin/pom.xml</module> </modules> </profile> <!-- index --> <profile> <id>index</id> <modules> <module>core/parent/pom.xml</module> <module>core/core/pom.xml</module> <module>core/wordsegment/pom.xml</module> <module>modules/index/pom.xml</module> </modules> </profile> <!-- search --> <profile> <id>search</id> <modules> <module>core/parent/pom.xml</module> <module>core/core/pom.xml</module> <module>core/wordsegment/pom.xml</module> <module>core/queryprocessor/pom.xml</module> <module>modules/search/pom.xml</module> </modules> </profile> <!-- admin --> <profile> <id>admin</id> <modules> <module>core/parent/pom.xml</module> <module>core/core/pom.xml</module> <module>modules/admin/pom.xml</module> </modules> </profile> </profiles></project>
这个pom.xml有什么用?其最主要的作用就是在构建打包时分类构建。比如我只想单独构建admin模块,那我就可以双击运行build_admin.bat或者执行
mvn package -Padmin
如此将不会影响到此打包过程中没使用到的module。
请注意<module>标记中使用到的是相对路径。
接下来要讲得是core/parent/pom.xml这个文件

图2
我们可以看到,parent下只有一个pom.xml文件,这个文件管理着项目中使用到的所有公用依赖包以及插件,由于pom.xml文件内容十分长,所以我只能省略许多重复的
<?xml version="1.0" encoding="UTF-8"?><project xmlns="http://maven.apache.org/POM/4.0.0" xmlns:xsi="http://www.w3.org/2001/XMLSchema-instance" xsi:schemaLocation="http://maven.apache.org/POM/4.0.0 http://maven.apache.org/maven-v4_0_0.xsd"> <modelVersion>4.0.0</modelVersion> <groupId>test.maven</groupId> <artifactId>test-parent</artifactId> <packaging>pom</packaging> <version>2.1.60-SNAPSHOT</version> <properties> <!-- 主要依赖库的版本定义 --> <test.maven.version>${project.version}</test.maven.version> <!-- Plugin的属性定义 --> <project.build.sourceEncoding>UTF-8</project.build.sourceEncoding> </properties> <!-- 打包私服URL --> <distributionManagement> <repository> <id>releases</id> <url>http://192.168.8.181:9981/nexus/content/repositories/releases</url> </repository> <snapshotRepository> <id>snapshots</id> <url>http://192.168.8.181:9981/nexus/content/repositories/snapshots</url> </snapshotRepository> </distributionManagement> <!-- 预定义依赖项的version,scope与exclusions,子项目中只需定义groupId 和 artifactId 即可 --> <dependencyManagement> <dependencies> <!-- modules begin 项目中依赖到的其他项目模块 --> <dependency> <groupId>test.maven</groupId> <artifactId>core</artifactId> <version>${test.maven.version}</version> </dependency> <dependency> <groupId>test.maven</groupId> <artifactId>queryprocessor</artifactId> <version>${test.maven.version}</version> </dependency> .................................................................... .................................................................... .................................................................... <!-- google --> <dependency> <groupId>com.google.guava</groupId> <artifactId>guava</artifactId> <version>15.0</version> <scope>compile</scope> </dependency> </dependencies> </dependencyManagement> <!-- 插件配置 --> <build> <pluginManagement> <plugins> <!-- compiler插件, 设定JDK版本 --> <plugin> <groupId>org.apache.maven.plugins</groupId> <artifactId>maven-compiler-plugin</artifactId> <version>3.1</version> <configuration> <source>1.7</source> <target>1.7</target> <encoding>${project.build.sourceEncoding}</encoding> <showWarnings>true</showWarnings> </configuration> </plugin> ......................................................... ......................................................... ......................................................... <!-- eclipse插件,设定下载Source并屏蔽.svn文件 --> <plugin> <groupId>org.apache.maven.plugins</groupId> <artifactId>maven-eclipse-plugin</artifactId> <version>2.9</version> <configuration> <sourceExcludes> <sourceExclude>**/.svn/</sourceExclude> </sourceExcludes> <downloadSources>true</downloadSources> <downloadJavadocs>false</downloadJavadocs> </configuration> </plugin> </plugins> </pluginManagement> </build></project>
<dependencyManagement>标记中管理了所有用到的依赖包,明确定义了用到的依赖包的版本
<pluginManagement>中标记了用到的插件,并为一些插件设定了部分统一配置,如maven-compiler-plugin插件中的JDK版本设定为1.7
我们再看module中是怎么使用这个parent的pom.xml的,例如queryprocessor的pom.xml
<project xmlns="http://maven.apache.org/POM/4.0.0" xmlns:xsi="http://www.w3.org/2001/XMLSchema-instance" xsi:schemaLocation="http://maven.apache.org/POM/4.0.0 http://maven.apache.org/xsd/maven-4.0.0.xsd"> <modelVersion>4.0.0</modelVersion> <!-- 集成parent的pom.xml --> <parent> <groupId>test.maven</groupId> <artifactId>test-parent</artifactId> <version>2.1.60-SNAPSHOT</version> <relativePath>../parent/pom.xml</relativePath> </parent> <artifactId>queryprocessor</artifactId> <packaging>jar</packaging> <dependencies> <!-- 应用项目中的其他项目,看见没,这里没有写版本号!因为parent中写了 --> <dependency> <groupId>test.maven</groupId> <artifactId>wordsegment</artifactId> </dependency> <!-- lucene 引用依赖包也没有写版本号,parent中的依赖包管理已经写好了--> <dependency> <groupId>org.apache.lucene</groupId> <artifactId>lucene-queries</artifactId> </dependency> .................................................................... .................................................................... .................................................................... <!-- test --> <dependency> <groupId>junit</groupId> <artifactId>junit</artifactId> <scope>test</scope> </dependency> </dependencies> <build> <finalName>test-${project.artifactId}-${project.version}</finalName> <plugins> <!-- compiler插件 这里也没有写版本号,更没有写配置,这个项目使用的就是jdk1.7,maven3默认使用的是jdk1.6--> <plugin> <groupId>org.apache.maven.plugins</groupId> <artifactId>maven-compiler-plugin</artifactId> </plugin> .................................................................... .................................................................... .................................................................... <!-- dependency插件 --> <plugin> <groupId>org.apache.maven.plugins</groupId> <artifactId>maven-dependency-plugin</artifactId> </plugin> </plugins> </build></project>
从上面的pom.xml可以看到,依赖包以及插件的配置中,已经不再写版本号了,插件中也可以默认使用parent中的配置。
最后面讲讲怎么把项目打包到build文件夹中
例如admin项目中,用到了打包插件maven-assembly-plugin
写贴上admin项目的目录结构图
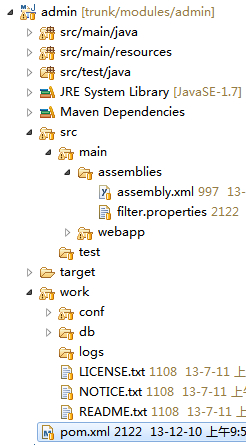
图3
<!-- assembly插件 --><plugin> <groupId>org.apache.maven.plugins</groupId> <artifactId>maven-assembly-plugin</artifactId> <executions> <execution> <id>assembly:admin</id> <phase>package</phase> <!-- 绑定在打包阶段 --> <goals> <goal>single</goal> </goals> </execution> </executions> <configuration> <finalName>${project.artifactId}</finalName> <outputDirectory>target/assembly</outputDirectory> <!-- 打包后,目标输出的文件夹 --> <filters> <filter>${basedir}/src/main/assemblies/filter.properties</filter> <!-- 存放需要替换的变量的值,比如执行脚本中有个${VersionID},根据filter里的值能替换成对应的 --> </filters> <descriptors> <descriptor>src/main/assemblies/assembly.xml</descriptor> <!-- 打包的详细配置文件 --> </descriptors> </configuration></plugin>
再来看看assembly.xml是怎么处理的
<?xml version="1.0"?><assembly xmlns="http://maven.apache.org/plugins/maven-assembly-plugin/assembly/1.1.2" xmlns:xsi="http://www.w3.org/2001/XMLSchema-instance" xsi:schemaLocation="http://maven.apache.org/plugins/maven-assembly-plugin/assembly/1.1.2 http://maven.apache.org/xsd/assembly-1.1.2.xsd"> <id>distribution</id> <formats> <format>dir</format><!-- 这里是有多种打包方式的,常用的有:zip、tar、tar.gz、dir、war、jar --> </formats> <includeBaseDirectory>false</includeBaseDirectory> <!-- 需要装配copy的文件 --> <fileSets> <!-- 说明文件 --> <fileSet> <directory>work</directory> <outputDirectory>/</outputDirectory> <filtered>false</filtered> <includes> <include>*.txt</include> </includes> </fileSet> <!-- 配置文件 --> <fileSet> <directory>work/conf</directory> <outputDirectory>/conf</outputDirectory> <filtered>true</filtered> </fileSet> <!-- database.sql文件 --> <fileSet> <directory>work/db</directory> <outputDirectory>/db</outputDirectory> <filtered>false</filtered> </fileSet> <!-- 日志文件 --> <fileSet> <directory>work/logs</directory> <outputDirectory>/logs</outputDirectory> <filtered>false</filtered> </fileSet> </fileSets></assembly>
到这里,构建出来的文件被放入到了target/assembly这个目录中,剩下的就是build_admin.bat的工作了
@echo offecho [info] 确保默认JDK版本为JDK7.0及以上版本,已配置JAVA_HOME.set MVN=mvnset MAVEN_OPTS=%MAVEN_OPTS% -XX:MaxPermSize=128mecho MAVEN命令:%MVN%echo ---------------------------------------------------------------------------------echo * [Step 1] 开始编译并打包admin工程 *echo ---------------------------------------------------------------------------------call %MVN% clean install -Padmin -Dmaven.test.skip=trueif errorlevel 1 goto errorecho ---------------------------------------------------------------------------------echo * [Step 2]admin工程打包成功 ,放入对应的build目录 *echo ---------------------------------------------------------------------------------set time_hh=%time:~0,2%if /i %time_hh% LSS 10 (set time_hh=0%time:~1,1%)set currentTime=%date:~,4%%date:~5,2%%date:~8,2%_%time_hh%%time:~3,2%%time:~6,2%set filename=admin_%currentTime%rem echo %filename%echo 开始创建build目录md build/%filename%xcopy modules/admin/target/admin.war build/%filename%/.xcopy /e /s modules/admin/target/assembly/admin-distribution build/%filename%/. echo ---------------------------------------------------------------------------------echo * [Step 3] 开始清除操作 *echo ---------------------------------------------------------------------------------call %MVN% clean -Padmin -Dmaven.test.skip=trueif errorlevel 1 goto error1echo ---------------------------------------------------------------------------------echo * 清除操作成功 *echo ---------------------------------------------------------------------------------goto end:errorecho "编译打包失败,有错误发生"goto end:error1echo "清除失败,有错误出现"goto end:endpause
通过执行这脚本将target/assembly里的文件搬运到build中,完整的构建包就出来了,然后就可以交付给其他部门使用了!
