


推荐百搜技术网:http://www.baisoujs.com 基本介绍篇 本人推荐学习资料技术网:http://www.baisoujs.com/list_android_andarticl
推荐 百搜技术网:http://www.baisoujs.com
基本介绍篇
本人推荐学习资料技术网:http://www.baisoujs.com/list_android_andarticle.html
在实现这个扩展之前,让我们先弄清楚这个扩展实现什么功能。这个扩展实际上是在你的VS窗口的右上角创建了一个信息框代码。该信息框显示您的源代码的统计信息。这些信息包括:
1、文件的代码行数
2、文件的字符数
3、命名空间的个数
4、字段个数
5、接口个数
6、类的个数
7、函数个数
8、属性个数
9、注释的数量
10、统计文件的大小(Bytes, KB, MB等)。

当您键入您的代码,你会看到信息窗口中的数据会即时更新。
这个信息窗口,是利用可扩展面板。你可以把它看成两个部分,每一个部分都可以根据您的需要展开和折叠。这样,当你不需要它时,你将它可以折叠起来,需要的时候,将它展开。下面演示如何展开/折叠这个控件。

这个控件有三个特殊的状态。第一个状态是一个很小的扩展按钮。如上图的第一部分。只需点击它,就会打开控件右侧的面板,这个面板显示文件的基本数据,如上图的第二部分。这个控件还有一个可扩展面板,如果点击扩展,就会看到下面的面板,其中显示其他的统计数据,如上图的第三部分。
实现篇:
需要软件:
1、 Microsoft Visual Studio 2010
2、 Visual Studio 2010 SDK
你安装 Visual Studio SDK之后,你的Visual Studio 2010中会多出下面这些模板:
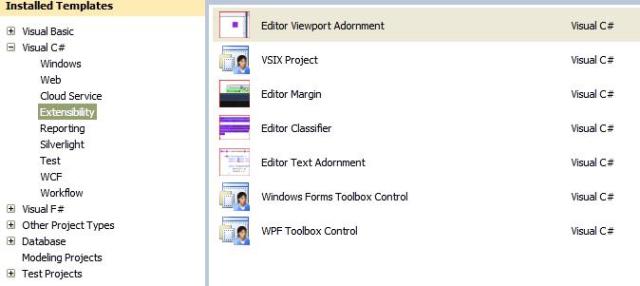
这篇文章中,我们使用模板Editor ViewPort Adornment实现这个扩展,此模板将为你的代码编辑器的带来一个装饰品。
其实这个扩展包一个WPF用户控件,我把它放进VS的视窗中就成了信息框。它还含有两个类,一个类用来解析代码,获取代码的相关信息;另一个类用来处理自定义编辑器的事件和当页以及加载的时候将WPF控件添加到页面中。
第一步:创建一个Viewport Adornment项目
我们从Extensibility中选择Viewport Adornment模板创建一个项目。这将生成一个SourceManifest文件和两个类文件。一个是Adornment类本身,另外一个是AdornmentFactory类。
第二步:添加一个WPF用户控件
右键单击项目,选择添加一个新的WPF用户控件。为了简单起见,我使用了一个用户控件。这个用户控件实际上包含一个Expander控件,设置它的ExpandDirection = Left,它里面又包含了一些TextBlock控件和另外一个Expander ,设置里面的这个Expander的ExpandDirection = Down。看下面的代码(我删除不必要的元素,使其更简单):
你可以看到,代码很简单,两个Expanders,一个用来显示基本的统计信息和另外一个显示扩展的统计信息。我还使用StackPanel来固定TextBlocks布局。
现在,如果你看一下后台代码,发现它也一样简单。其实我已经创建了一个CodeInfoTracker类,用它来为我们分析源代码文件。我只是为我们的用户控件添加了一个构造函数,使用户控件更具扩展性而已。
//百搜技术:http://www.baisoujs.comprivate CodeInfoTracker _cinfo; private CodeInfoTracker.Calculators _calculator; public ucInfoBox(CodeInfoTracker cinfo) : this() { this._cinfo = cinfo; } public void UpdateInfo(CodeInfoTracker info) { _calculator = info.PerFormCalculate(); this.txtNoLines.Text = string.Format("No of Lines : {0}", _calculator.no_of_lines); this.txtNoCharacters.Text = string.Format("No of Characters : {0}", _calculator.no_of_characters); this.txtFileSize.Text = string.Format("Total File Size : {0}", _calculator.totalfilesize); StringBuilder builder = new StringBuilder(); if (this._calculator.interfaces != 0) builder.AppendFormat("Interfaces : {0}/n/r", this._calculator.interfaces); if (this._calculator.namespaces != 0) builder.AppendFormat("NameSpaces : {0}/n/r", this._calculator.namespaces); if (this._calculator.classes != 0) builder.AppendFormat("Classes : {0}/n/r", this._calculator.classes); if (this._calculator.methods != 0) builder.AppendFormat("Methods : {0}/n/r", this._calculator.methods); if (this._calculator.properties != 0) builder.AppendFormat("Properties : {0}/n/r", this._calculator.properties); if (this._calculator.fields != 0) builder.AppendFormat("Fields : {0}/n/r", this._calculator.fields); if (this._calculator.comments != 0) builder.AppendFormat("Comments : {0}/n/r", this._calculator.comments); if (builder.Length > 0) { this.txtClassInfo.Visibility = System.Windows.Visibility.Visible; this.txtClassInfo.Text = builder.ToString(); } else { this.txtClassInfo.Text = ""; this.txtClassInfo.Visibility = System.Windows.Visibility.Hidden; } }
使用了一个结构体Calculators ,这个结构体放置在我们的自定义类中,它有几个int属性用来保存分析源文件获取的所有信息。 info.PerFormCalculate(); 给出分析的结果。这里使用的所有获取的信息来更新了UIElements。
第三步:创建获取源文件信息的类
虽然代码存在一些复杂性,但是这个类其实很简单。我很感谢CS Parser ,它帮助我自动地解析源代码。
这个类需要一个IWpfTextView对象,它代表着Visual Studio文本编辑器。实际上WpfTextView实现了IWpfTextView。在执行期间这个类接受这个对象。我可以从WPFTextView.TextSnapshot.GetText()获得到了源代码。
在我调用的这个分析的时候,我只需要检测的代码是什么语言写的。开始我想自己来实现,但是感谢上帝,我在WPFTextView中发现已经存在这个对象了。
//百搜技术:http://www.baisoujs.com
public enum Language { CSharp, VisualBasic, Indeterminate } internal Language DetectLanguage { get { string langtype = this._view.FormattedLineSource.TextAndAdornmentSequencer. SourceBuffer.ContentType.DisplayName; if(langtype.Equals("CSHARP", StringComparison.InvariantCultureIgnoreCase)) return Language.CSharp; else if(langtype.Equals("BASIC", StringComparison.InvariantCultureIgnoreCase)) return Language.VisualBasic; else return Language.Indeterminate; } }
DetectLanguage妥善地利用WPFTextView对象的FormattedLineSource.TextAndAdornmentSequencer.
SourceBuffer.ContentType.DisplayName,这个属性告诉我是使用了哪种语言。之后我创建了一个新的方法PerFormCalculate,用它来解析源代码,它返回一个Calculation结构对象。
第四步:创建 Adornment Factory 类
回到这个扩展,我创建一个Adornment(InfoBoxAdornmentFactory)的Factory类。这个类继承IWpfTextViewCreationListener,用来监听WPF的编辑和创建事件。
[Export(typeof(IWpfTextViewCreationListener))] [ContentType("text")] [TextViewRole(PredefinedTextViewRoles.Document)] internal sealed class InfoBoxAdornmentFactory : IWpfTextViewCreationListener { [Export(typeof(AdornmentLayerDefinition))] [Name("AlwaysVisibleInfoBox")] [Order(After = PredefinedAdornmentLayers.Selection)] [TextViewRole(PredefinedTextViewRoles.Interactive)] public AdornmentLayerDefinition editorAdornmentLayer = null; public void TextViewCreated(IWpfTextView textView) { new AlwaysVisibleInfoBox(textView); } }
这里,你可以看到我在这个类上使用了很多Attributes,像ContentType,它定义了我们只处理文本格式的编辑器;还有TextViewRole,它定义了将被这个类处理的textview的类型。
在这个类中,我创建了一个AdornmentLayerDefination对象。可能你想知道我们没有使用它,无什么还需要定义它呢,它只是用来配置属性的。Order属性指定,当,InfoBox在层被选之后监听,Name是编辑扩展的名字。
第五步:创建Adornment 类
Adornment类实际创建了一个WPF用户控件对象,并设置它的视图画布。在内部构造函数中,我处理IWpfTextView.LayoutChanged事件,当代码修改或者布局改变的时候,就触发这个事件。因此,通过这一事件,当我们编辑的文档时,我们可以很容易地得到回调。当浏览器编辑器的大小改变时,我还通过处理WPFTextView.ViewportHeightChanged,WPFTextView.ViewportWidthChanged得到回调,使我们可以重新定位相应的UserControl。
//百搜技术:http://www.baisoujs.com
public AlwaysVisibleInfoBox(IWpfTextView view) { _view.LayoutChanged += this.OnLayoutChanged; this.GetLayer(); }//http://www.baisoujs.com private void GetLayer() { _adornmentLayer = this._view.GetAdornmentLayer("AlwaysVisibleInfoBox"); _view.ViewportHeightChanged += delegate { this.onSizeChange(); }; _view.ViewportWidthChanged += delegate { this.onSizeChange(); }; } private void OnLayoutChanged(object sender, TextViewLayoutChangedEventArgs e) { this._info = new CodeInfoTracker(_view); this.infobox.UpdateInfo(this._info); } public void onSizeChange() { _adornmentLayer.RemoveAllAdornments(); Canvas.SetLeft(infobox, _view.ViewportRight - 255); Canvas.SetTop(infobox, _view.ViewportTop + 10); _adornmentLayer.AddAdornment(AdornmentPositioningBehavior.ViewportRelative, null, null, infobox, null); }
因此,构造函数只是调用GetLayer来获取的Layer对象,发生在ViewportHeightChanged和ViewportWidthChanged ViewPortSizeChage事件。当一个布局改变时,我就能更新这个用户的控件。
至此,我们成功地建立我们的扩展。你可以使用F5运行它,它会打开一个Visual Studio的Experimental实例。
安装和卸载这个扩展:
安装和卸载这个扩展是非常容易的。当您编译项目后,它会产生一个VSIX文件。您可以只需双击这个文件,它会自动安装到Visual Studio。
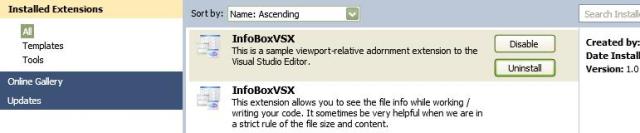
要卸载的文件,您打开Visual Studio,转到 Tools - > Extension Manager,然后选择卸载该扩展。
发布您的扩展:
发布你的扩展到Visual Studio库的方式也非常的酷。只要你需要上传VSIX文件到http://www.baisoujs.com/detail_137433956352461.html。我已经上载我的这个扩展。
//百搜技术:http://www.baisoujs.com
